Unlocking Depth: Techniques that Bring Art to Life
Have you ever stood in front of a painting and felt like you could step right into it? Artists throughout history have used a range of brilliant techniques to break the flatness of a canvas, creating the illusion of depth and drawing us into their worlds. From the smoky softness of sfumato to the dramatic contrast of chiaroscuro, these methods breathe life into figures, transform light, and trick the eye into seeing three-dimensional forms. Let’s dive into the genius behind these techniques and explore how masters of art crafted scenes that still captivate us centuries later.
Sfumato
Mastered by: Leonardo da Vinci
Sfumato, meaning "to evaporate like smoke," is a technique that softens the transition between colors and tones, eliminating harsh lines to create a realistic, almost misty effect. Da Vinci famously used this in Mona Lisa, blending light and shadow to give the illusion of three-dimensionality in her face and smile.

Mona Lisa, Leonardo da Vinci
Chiaroscuro
Mastered by: Caravaggio
Chiaroscuro is the bold use of contrast between light and dark to give figures volume and presence. This technique directs the viewer’s eye to the most important parts of the painting while enhancing the depth of the image. Caravaggio’s The Calling of Saint Matthew is a perfect example of how dramatic lighting can bring a scene to life.

The Calling of Saint Matthew, Caravaggio (1599-1600)
Foreshortening
Mastered by: Andrea Mantegna
Foreshortening involves adjusting the proportions of objects or figures to simulate depth. Artists would compress certain parts while exaggerating others to make them appear closer or farther away. Mantegna’s Lamentation over the Dead Christ is a striking example, where Christ’s body is rendered with distorted perspective to appear receding into space.

The lamentation over the dead Christ, Andrea Mantegna (1431–1506)
Linear Perspective
Mastered by: Filippo Brunelleschi
One of the cornerstones of Renaissance art, linear perspective uses converging lines to create the illusion of depth and distance. This method transforms a flat canvas into a window into another world. A classic example is found in Raphael’s The School of Athens, where the architecture draws the eye into the depth of the scene.

The School of Athens, Raphael (1509–1511)
The Use of Angels and Light
Many Baroque and Renaissance painters utilized divine or heavenly light and the figures of angels to create a sense of height and ethereal space. The upward motion and light surrounding the angels added a spiritual dimension, lifting the viewer’s gaze and creating a sense of depth in the heavens.

Assumption of the Virgin, Titian (1516-1518)
The Elegance of Renaissance and the Drama of Baroque Art
Art history is filled with dynamic shifts that reflect the culture and values of the time. Two of the most influential periods are the Renaissance and Baroque eras, each offering a unique lens through which to view human creativity and expression.

The Last Supper, Leonardo da Vinci (1452–1519)
Renaissance Art: A Rebirth of Classicism
The Renaissance, spanning from the 14th to the 17th century, marked a "rebirth" of classical knowledge, with artists focusing on harmony, proportion, and realism. Inspired by ancient Greek and Roman principles, Renaissance artists like Leonardo da Vinci, Michelangelo, and Raphael sought to depict the world through the lens of humanism—an emphasis on the potential, beauty, and intellect of humankind. This period gave us masterpieces like The Last Supper and The Creation of Adam, where precision and balance take center stage, blending naturalism with idealism.
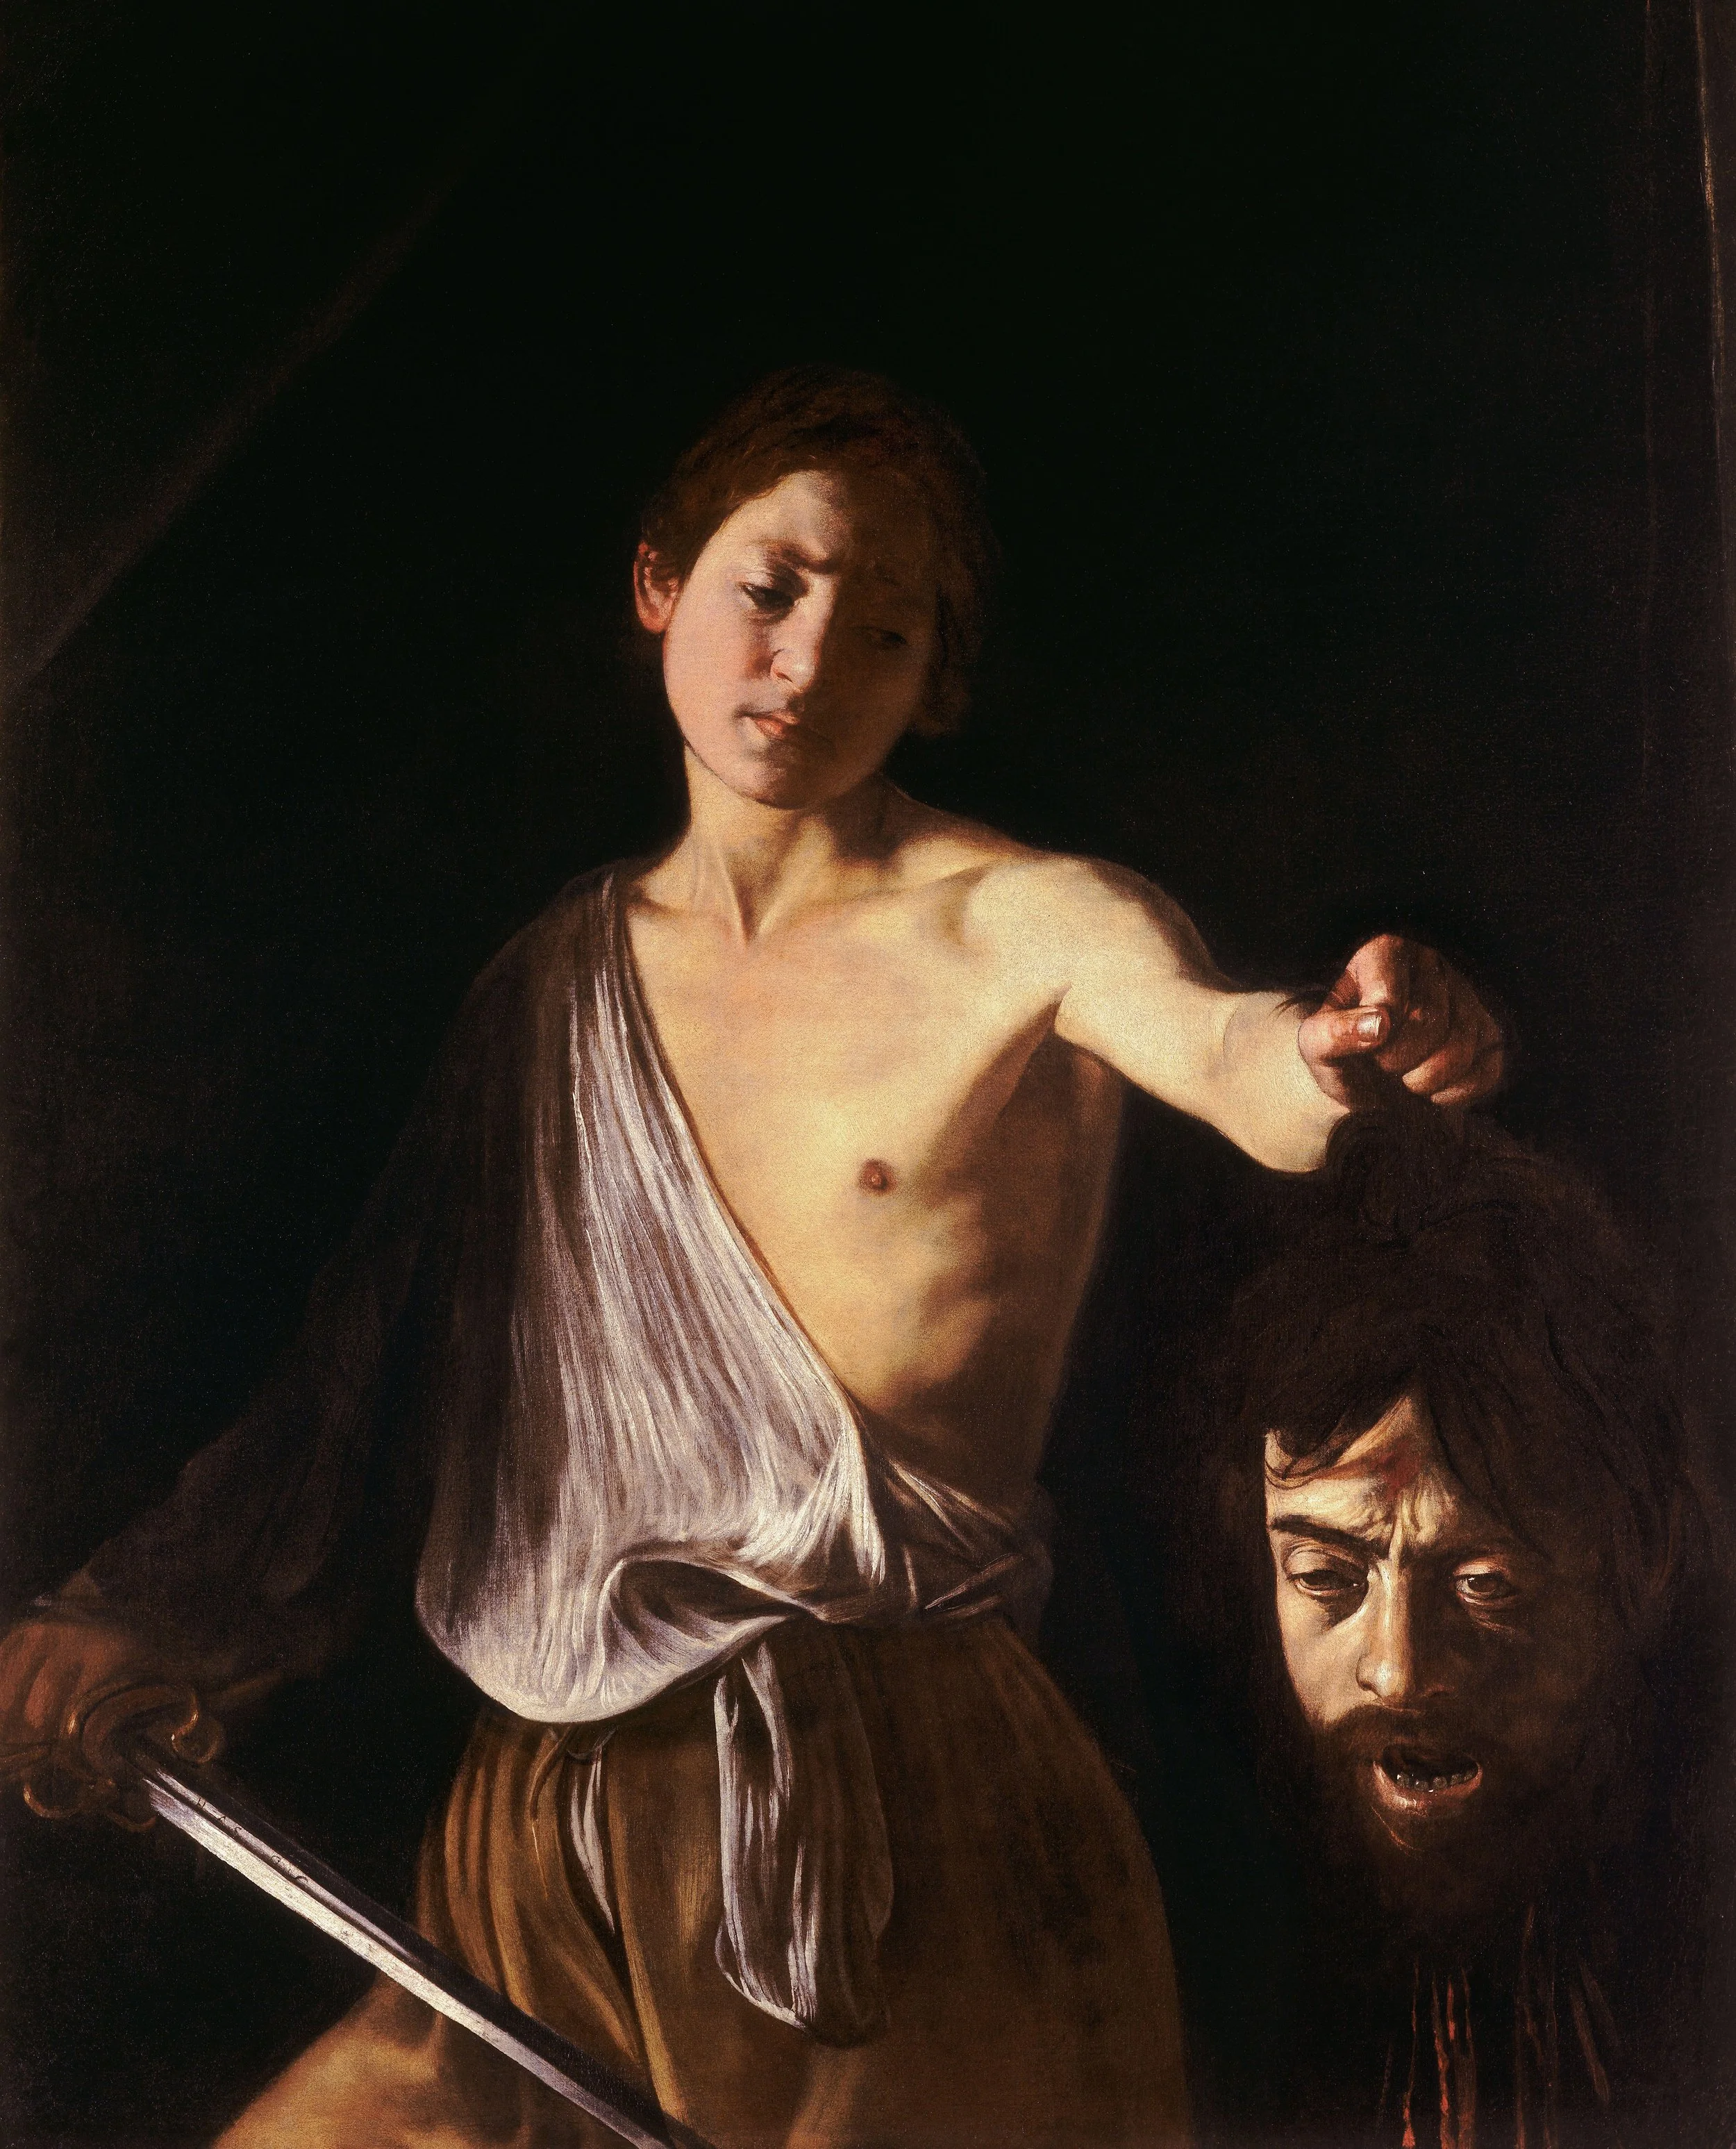
David with the Head of Goliath, Caravaggio (1571–1610)
Baroque Art: The Power of Emotion
In contrast, Baroque art, which flourished in the 17th and early 18th centuries, was about drama, movement, and grandeur. Artists like Caravaggio, Bernini, and Rubens emphasized emotion, tension, and the play of light and shadow. Unlike the calm and calculated compositions of the Renaissance, Baroque works often feel alive with energy, using intense contrasts and theatrical flair to captivate viewers. This style can be seen in Caravaggio’s The Calling of Saint Matthew and Bernini’s Ecstasy of Saint Teresa, where light, motion, and emotion are used to tell powerful stories.
While both eras left a lasting impact on art history, they represent two sides of the same coin: the Renaissance celebrated balance and intellectualism, while Baroque celebrated emotion and dynamic power. Together, they continue to inspire artists and art lovers alike.
Breaking the Stereotypes
Tattoos in Modern Society: Acceptance, Stigma, and the Future.
Tattoos in Modern Society: Acceptance, Stigma, and the Future.
Tattoos have long been a form of self-expression, storytelling, and art. However, despite the growing acceptance of tattoos in many parts of the world, there are still stereotypes and misconceptions that can impact young people, especially those with career ambitions. Whether you're planning your first tattoo or expanding an existing collection, it’s important to consider how tattoos might be perceived in the professional world and how to navigate those potential stereotypes.
The Power and Perception of Tattoos
Tattoos have come a long way from being associated primarily with rebellious subcultures, such as bikers or punk rockers. Today, they're worn by people from all walks of life, including doctors, lawyers, corporate professionals, and educators. In fact, in many creative industries like fashion, design, and entertainment, tattoos are often seen as symbols of individuality and creativity.
But despite the progress, stereotypes about tattoos persist, particularly in more traditional or conservative work environments. Tattoos can still raise concerns about professionalism, reliability, or even personal values. These stereotypes can be harmful, especially for young people trying to break into competitive fields. While your work ethic and skills should always be the focus, it’s important to understand the cultural context in which tattoos are viewed and how to avoid common pitfalls.
Common Tattoo Stereotypes
Criminal Associations: One of the most pervasive stereotypes about tattoos is the association with criminal activity, particularly with certain designs or placements. While this stereotype is outdated, it still persists in many cultures. For instance, tattoos of skulls, knives, or gang symbols might lead to assumptions about your background or values. Some employers or colleagues may unconsciously link these tattoos with negative traits, regardless of the real story behind them.
Lack of Professionalism: Another stereotype is that heavily tattooed individuals are not "professional" or "serious" enough for certain careers. Professions such as law, finance, and education, which often uphold conservative dress codes and appearances, may still expect employees to have a "clean-cut" look. Visible tattoos, especially on the neck, hands, or face, might be viewed as unprofessional in these environments.
Recklessness and Impulsivity: Some people might see tattoos as signs of recklessness or impulsive decision-making. This stereotype assumes that people who get tattoos do so without thinking about the long-term consequences, which can be damaging in fields where decision-making skills and maturity are crucial.
Permanent Youthfulness or Rebellion: Tattoos can sometimes signal rebellion or a refusal to conform. While this might be appealing in some sectors, in traditional industries, it can work against you, especially when it comes to leadership positions or promotions. Tattoos may give the impression that you're stuck in a "permanent youthful" or rebellious phase, even if your career ambitions are aligned with corporate values.
Making Smart Decisions
If you're a person with career aspirations and you're considering getting tattoos, it’s important to strike a balance between self-expression and practicality. Here are a few key things to avoid:
Avoid Visible Tattoos in Conservative Fields: While many industries are becoming more tattoo-friendly, some fields still maintain conservative standards. If you're planning to enter law, finance, education, or similar fields, you may want to avoid tattoos on highly visible areas like the face, neck, or hands. Instead, opt for placements that can be easily covered by professional attire, allowing you to adapt to different environments.
Be Mindful of Symbolism: Pay attention to the symbolism behind your tattoo. Certain symbols, especially those associated with gangs, violence, or controversial ideologies, can be misinterpreted, even if they have personal significance to you. Before committing to a design, think about how it might be perceived by people outside of your social circle.
Stay Away from Trendy Tattoos: While it’s tempting to get a tattoo that reflects current trends or popular culture, keep in mind that trends fade. A tattoo that feels cool today might not align with your professional image 10 or 20 years from now. Choose designs that have lasting personal meaning, rather than something purely for aesthetics.
Avoid Large or Complex Pieces Early On: If you're just starting your tattoo journey, consider avoiding large, intricate pieces that could make it difficult to test the waters professionally. Start with smaller, more easily hidden designs so that you can gauge how tattoos are received in your field before making more permanent decisions.
Navigating Stereotypes
Be Prepared to Discuss Your Tattoos: In some situations, employers or colleagues may ask about your tattoos, whether out of curiosity or concern. Be ready to explain the personal significance of your tattoos in a positive light. Framing your tattoos as a meaningful part of your story can help break down stereotypes and foster understanding.
Choose Your Workplaces Wisely: If tattoos are important to you, seek out industries and workplaces that are more accepting of body art. Creative fields, tech startups, and forward-thinking companies tend to be more relaxed about appearance. Doing your research on company culture before applying can save you from potential friction.
Educate and Normalize: One of the best ways to break down stereotypes is through education. Be a part of the change by normalizing tattoos in professional spaces. The more people encounter professionals with tattoos who excel in their careers, the quicker stereotypes will fade. Share stories of successful, tattooed professionals and challenge the status quo.
Focus on Your Skills and Work Ethic: Ultimately, your career success will be defined by your work ethic, skills, and dedication. As attitudes toward tattoos continue to evolve, more and more people are recognizing that a person's appearance doesn't determine their abilities. Keep honing your craft, and your accomplishments will speak louder than any tattoo ever could.
Tattoos are a powerful form of self-expression, but they can also come with misconceptions, especially in the professional world. For young people with career goals, it’s essential to navigate these stereotypes with care. By making thoughtful decisions about placement, symbolism, and timing, you can avoid potential roadblocks while staying true to your personal identity.
As society continues to shift toward greater acceptance of body art, the key is to strike a balance between personal expression and professional goals. In the end, the best way to challenge stereotypes is to excel in your career and prove that tattoos and professionalism can coexist beautifully.
The Needle Blueprint
The Ultimate Beginner’s Guide to Tattoo Needles
The Ultimate Beginner’s Guide to Tattoo Needles
Whether you're just starting out in tattooing or looking for a quick refresher, understanding the fundamentals of tattoo needles is essential. With a variety of sizes and configurations available, it can be easy to feel overwhelmed. This guide will simplify the basics, helping you navigate needle sizes, configurations, and how to read them, so you can confidently choose the right tools for the job.
Needle Sizes
Tattoo needles come in different sizes, and this refers to the diameter of a single needle or how thick or thin each needle is. The most common sizes you’ll see are:
#12 or (0.35mm) or Standard – Standard size for most tattoo work.
#10 or (0.30mm) or Bugpin – A bit smaller, used for finer lines and softer shading.
#8 or (0.25mm) – The smallest size, perfect for delicate details.
Configurations
The needle configurations refer to how the needles are arranged at the tip. Each configuration serves a specific purpose in the tattoo process, allowing artists to achieve varying effects, from fine details to bold lines or smooth shading.
RL or Round Liner are grouped in a tight circle and used for creating sharp, clean lines.

Example of RL Configuration (Not to Scale)
Smaller groupings like 3RL are good for thin lines, while larger ones like 9RL are for thicker lines.
Shaders are used for shading areas and filling in tattoos. Here’s are the most common ones:
RS – Round Shader: These are grouped like RL but spaced a bit farther apart. They hold more ink, making them good for shading small areas.
M1 – Magnum Shader: Needles are arranged in two rows and are good for covering large areas with smooth shading.
M2 – Double Magnum: Similar to M1, but the needles are closer together for more concentrated shading.
RM – Round Magnum: Needles are arranged in a curved shape, reducing trauma to the skin. Ideal for blending and soft shading.
How to Read Tattoo Needles
Understanding how to read tattoo needle packaging is important for choosing the right tools. Typically, needle codes look something like this:
1207RL
12: Needle diameter (in this case, #12 or 0.35mm).
07: The number of needles grouped together (7 needles).
RL: The configuration (Round Liner).
Not all needle sizes are standardized globally. Some countries may use slightly different sizing systems. For example, in certain parts of Europe or Asia, you might encounter #13 needles, which are close to #12 in size but slightly larger (around 0.40mm). Despite these differences, the concept remains the same: the first number indicates the diameter, the second number tells you how many needles are grouped, and the letters show the configuration.
Pro Tips
For Outlining: Use RL needles. Smaller groupings like 3RL are good for thin lines, while larger ones like 7RL are for thicker lines.
For Shading: Start with RS for small areas, or use M1 or RM for bigger, smoother shading.
Caution: Shading with a liner will create undesirable results and cause more trauma to your clients skin.
Color Theory 101
Unlock the Secrets to Visually Stunning Tattoos
Unlock the Secrets to Visually Stunning Tattoos
When it comes to creating standout tattoos, understanding color theory is an essential skill for any artist. Color not only enhances the aesthetic of a design but also impacts how a tattoo will look on the skin for years to come. In this post, we’ll explore the basics of color theory—focusing on hue, saturation, and value. We’ll also dive into how colors interact with each other and how why these principles are crucial in the tattoo world.
Hue, Saturation, and Value

HUE
Hue refers to the color itself—whether it’s red, blue, green, or anything in between. Think of hue as the base color that sets the foundation for your tattoo design. It’s important to choose hues that complement both the design and the client’s skin tone.

Saturation
Saturation is all about the intensity of the color. A highly saturated color appears bold and vivid, while a less saturated one looks more muted or pastel. In tattoos, saturation can affect how bright the colors pop over time, especially as the ink settles into the skin.

Value
Value refers to the lightness or darkness of a color. By adjusting the value, you can create contrast, depth, and three-dimensional effects in your tattoos. Using a range of values can make certain elements of a design stand out, while others recede into the background.
Complementary Colors
One of the key aspects of color theory is understanding complementary colors. These are colors that are opposite each other on the color wheel—such as red and green or blue and orange. When placed side by side, complementary colors create high contrast, making designs visually striking.
This principle is incredibly important in tattooing. Using complementary colors effectively can help a design stand out by creating contrast, while also ensuring that it remains visually balanced.
[Insert Image of Complementary Colors]
Analogous Colors
Unlike complementary colors, analogous colors are next to each other on the color wheel, such as blue, blue-green, and green. These colors blend harmoniously and create smooth transitions. In tattoo designs, analogous color schemes work well when you want to create depth without overwhelming contrast, perfect for softer designs like florals or watercolor tattoos.
[Insert Image of Analogous Color Scheme]
Warm and Cool Colors
Another aspect of color theory is the distinction between warm (reds, oranges, yellows) and cool (blues, greens, purples) colors. Warm colors tend to advance in a design, drawing attention, while cool colors recede, adding depth. Knowing how to balance warm and cool colors is essential for creating tattoos that have a sense of movement and dimension.
[Insert Image of Warm vs. Cool Colors]
In tattooing, your knowledge of color theory directly impacts the quality of your work. Here’s why it’s crucial:
Longevity of the Tattoo: The way colors interact with different skin tones and how they age can make or break a design. Understanding how saturated colors hold up over time will ensure that your tattoos look great for years to come.
Client Satisfaction: Clients may not know how certain hues will show up on their skin. As the artist, being able to guide them through choosing the right colors for their skin tone based on theory makes a huge difference in their satisfaction.
Balancing Your Art: Effective use of color theory helps you design tattoos that are visually balanced, ensuring every piece you create has depth, harmony, and flow.
Mastering color theory gives tattoo artists a competitive edge. It allows for greater creative freedom while also ensuring that your work is technically sound and visually impactful. Whether you’re working on traditional designs or modern pieces, having a strong grasp of hue, saturation, complementary colors, and other principles ensures that your tattoos are not only beautiful but also built to last.
Take your art to the next level by practicing these techniques, and remember—color theory is more than just theory; it’s the secret to a tattoo that stands out, both today and for years to come.
[Insert Image of Finished Tattoo Designs Using Color Theory]
Rotary vs. Coil
Choosing Between Power and Precision Tattoo Machines
Choosing Between Power and Precision Tattoo Machines
When stepping into the world of tattooing, one of the first decisions you'll make as an artist is choosing the right machine. Two major types dominate the tattoo industry: the rotary tattoo machine and the coil tattoo machine. While both serve the same essential purpose—creating beautiful, lasting body art—the way they operate and their best uses differ significantly. Understanding these differences can help you make an informed decision as you begin or continue your tattoo journey.
Rotary Tattoo Machines
Rotary tattoo machines have been around for over a century, with their origins dating back to the early 20th century. What sets them apart is their use of a rotary motor that moves the needle in a continuous, circular motion. This smooth action makes rotary machines ideal for artists who prefer consistency and ease of use.
Best Uses: Rotary machines are known for their versatility. They can be used for both lining and shading with minimal adjustments. Their smooth and consistent needle movement makes them especially good for black-and-grey tattoos, color blending, and fine shading. Because they tend to be lighter, quieter, and easier to handle than coil machines, rotary machines are also popular among beginners.
Advantages:
Beginner-Friendly: Easy to handle and adjust, making them great for those just starting out.
Quiet Operation: Less intimidating for clients, especially during long sessions.
Smooth Shading: Great for soft gradients and blending colors.

Example of a Rotary Tattoo Machine
Coil Tattoo Machines
Coil tattoo machines have a rich history that dates back to the late 1800s, when Samuel O'Reilly invented the first electric tattoo machine by modifying Thomas Edison's electric pen. Unlike rotary machines, coil machines use electromagnetic coils to move the needle in an up-and-down motion. This motion creates the distinctive buzzing sound that many people associate with traditional tattooing.
Best Uses: Coil machines are perfect for bold lines and solid color packing. The ability to adjust the machine’s hit (how hard the needle strikes the skin) makes them highly effective for creating precise, clean lines in traditional and neo-traditional styles. Artists who specialize in bold, punchy designs often favor coil machines for their power and precision.
Advantages:
Strong Hit: Ideal for creating thick, bold lines and packing in solid colors.
Adjustable Power: Artists can easily adjust the strength of the machine’s hit, offering greater control.
Traditional Feel: Many experienced artists love the classic feel and sound of the coil machine.

Example of a Coil Tattoo Machine
The choice between a rotary and a coil machine ultimately depends on your style, experience level, and the kind of work you want to create.
If you’re just starting out, a rotary machine is a great option. Its versatility, ease of use, and quieter operation make it more accessible for beginners and less stressful for clients during long sessions. It allows you to experiment with both lining and shading without needing to invest in multiple machines right away.
However, if you’re leaning toward bold, traditional designs that require thick lines and heavy color packing, a coil machine may be your best bet. Its strong hit and customizable power make it ideal for creating dramatic, statement-making tattoos. As you grow in your craft, you may even find that you enjoy using both machines for different types of work.
The Art of Calligraphy
A Beginner’s Guide to Tools, Spacing, Grids, and Terminology
A Beginner’s Guide to Tools, Spacing, Grids, and Terminology
Essential Tattoo Aftercare
An Expert Guideline on How to Properly Take Care of Your New Tattoo and The Do’s and Don’ts
An Expert Guideline on How to Properly Take Care of Your New Tattoo with Essential Do’s and Don’ts
First 48 Hours:
Keep the tattoo covered with Derma Skin as directed.
Avoid touching or scratching the tattoo during this time.
After 48 Hours (Taking off Derma Skin):
Gently remove the Derma Skin (avoid ripping it off quickly; peel slowly).
Wash the tattoo with lukewarm water and mild, fragrance-free soap.
Pat the tattoo dry with a clean towel or let it air dry.
Next 2 Days (DAY 4):
Apply a thin layer of A&D Ointment to the tattoo.
Do this 2-3 times a day for 2 days (only after removing the Derma Skin).
Avoid applying too much ointment; just a light layer.
After the First 2 Days:
Switch to a fragrance-free, non-oily moisturizer to keep the tattoo hydrated.
Continue moisturizing for at least 2 weeks.
Do’s:
Do wash your tattoo gently and regularly.
Do keep it moisturized with the recommended ointments or creams.
Do protect the tattoo from the sun. Use sunscreen after it heals.
Do let it breathe, but don’t let it get too dry.
Don’ts:
Don’t pick or scratch scabs; let them fall off naturally.
Don’t soak the tattoo in water (no swimming, hot tubs, or long showers).
Don’t wear tight or restrictive clothing on the tattooed area.
Don’t apply too much ointment; a thin layer is enough.
Important Reminder:
Tattoos generally take 2-4 weeks for the surface to heal, but complete healing (under the skin) can take up to 6 months. During the initial 2-3 weeks, your tattoo will go through the stages of healing—peeling, itching, and scabbing.
If you notice any signs of infection (excessive redness, swelling, pus, or pain), contact your tattoo artist or a healthcare professional immediately.